
How To Make Large Balaclava Pattern | Model B002

Pattern Descritption
Model #
B002
Balaclava sewing pattern. Pattern is one size fits all and unisex.
Pattern can be made in multiple variations with or without face mask.
Download includes supply list and full pattern.
All patterns are designed to print on standard household printers.
Printable pattern download link is instantly sent to your email.
DON'T WANT TO READ OFF YOUR DEVICE? PRINT PDF HERE
WANT TO WATCH THE STEP BY STEP VIDEO? LINK HERE
PROJECT SUPPLIES
Main Fabric: | .5-1 yards (sherpa, fleece, sweatshirt fleece, any stretch material) |
Cord/Drawstring: | 1 yard (any style) |
Elastic Cord: | .5-1 (any size and any style) |
Cord Stopper: | 2-3 (any style)(make sure it works with the elastic cord you pick out) |
Eyelets: | 4 (any size)(make sure diameter is large enough for elastic cord to fit through) |
Images below show supplies used in project.


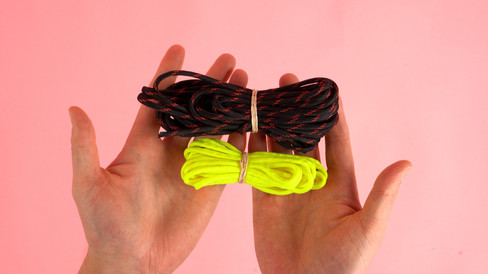


NOTE: All supplies can be changed and switched to your liking. Get creative and have fun picking out custom materials.
Recycling/repurposing old clothing and furniture into fabric not only gives these items a second life but also significantly contributes to reducing waste and promoting sustainable living.
List of a few common items: Upholstery Fabric, Curtains and Draperies, Bed Linens and Towels, Sweaters, Denim (jeans and jackets), Sweater, Quilts, Tote bags, Cleaning rags, T-Shirts. Any type of fabric can be utilized and recycled
SCROLL TO VIEW ENTIRE TABLE CONTENTS
For a professional finish on your project, make sure to check out our recommended machines and tools! We've curated a list of essential sewing equipment to help you achieve that expert look with ease. You'll find all the information you need by clicking the button right here. Don't miss out on elevating your sewing game to the next level!
RECOMMENDED MACHINES/TOOLS
PRINTING PATTERN


When printing your sewing pattern, it's crucial to ensure that the pattern is printed at 100% scale or "actual size" in the print settings. This step is important to maintain the integrity of the design and ensure that the dimensions are accurate for your project. Not adjusting the print settings accordingly can result in a pattern that is either too small or too large, leading to potential issues with the fit and final outcome of your sewing project.
Trim the top and one of the side edges up to the margin box. This will make it help when line up the pages for a perfectly aligned pattern.
Layout the pattern lining up the diamonds and pages in alphanumeric.
Tape pages together.
Cut on the outside of the black line.
CLICK IMAGE TO ENLARGE
PATTERN PIECES


Hood Center Panel: Cut 1 total. 1: Main Fabric


Neck Cover Panel: Cut 1 total. 1: Main Fabric


Shoulder Cover Panel: Cut 1 total. 1: Main Fabric


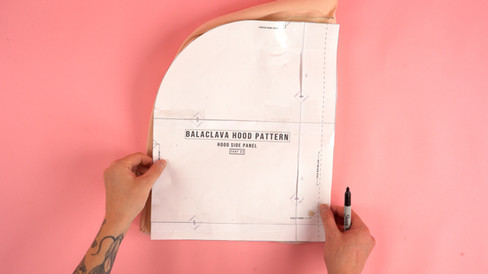
Hood Side Panel: Cut 1 total. 1: Main Fabric
CLICK IMAGE TO ENLARGE
STEP BY STEP ASSEMBLY
STEP 1


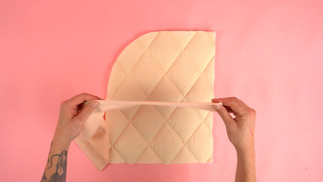


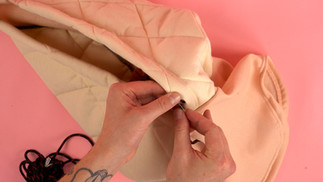
Start by grabbing the HOOD CENTER PANEL and HOOD SIDE PANEL.
Locate the long edge on the CENTER HOOD PANEL and the back curved edge on the HOOD SIDE PANEL.
Place the right side of the HOOD CENTER PANEL on right side of the HOOD SIDE PANEL on the back curved edge.
Stitch stitch the HOOD CENTER PANEL to the HOOD SIDE PANEL at .25 inch seam allowance.


Before we moving onto the next step I highly recommend looking into a few different sewing methods to improve the outcome of your sewing projects.
The first technique is using a Serger Sewing Machine.
A serger machine, also known as an overlocker, is a specialized type of sewing machine designed for edging, hemming, or seaming fabric. It's particularly famous for its use with stretch knit fabrics due to its ability to create clean, finished edges and seams that are strong and stretchy. Sergers differ from traditional sewing machines in several key ways and offer unique advantages, especially for handling stretchy materials.
Edge Finishing: The serger trims and finishes fabric edges in one pass, creating a professional and durable edge that resists fraying and rolling, which is common in knit fabrics.
Elasticity: The overlock stitch created by a serger is inherently stretchy, making it perfect for constructing stretch knit garments. The seams will stretch with the fabric without breaking or puckering, providing comfort and durability in wear.
Speed: Sergers are typically faster than traditional sewing machines, allowing for quicker construction of garments and projects, especially beneficial when working with large quantities of fabric or producing multiple garments.
Professional Look: The finished seams produced by a serger are similar to those found in store-bought garments, giving homemade projects a more professional appearance.
Versatility: While primarily used for seams, sergers can also create decorative edges, roll hems, and other specialized stitches, adding versatility to your sewing projects.
For those working regularly with stretch knit fabrics, a serger is an invaluable tool, significantly enhancing the quality and durability of your projects. While there is a learning curve associated with using a serger, its benefits for sewing stretchy, fraying, and lightweight fabrics are unparalleled once mastered.
The second method is using a Zig-Zag stitch on a standard sewing machine.
(information on the zig-zag stitch is above)
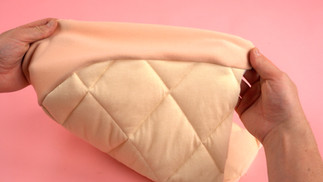
STEP 2


Next we will be adding a top stitch to the new seam.
Fold the seam allowance toward the HOOD CENTER PANEL.
Add a stitch front the right side of the fabric directly on top of the seam allowance.
Pro Tip: Try using an edge presser foot.
An edge presser foot is a sewing machine attachment designed to help guide fabric for precise sewing near the edges or hems. It typically features a guide, either in the form of a metal flange or a plastic or metal guide bar, that aligns with the edge of the fabric, ensuring that the stitching is evenly spaced from the edge throughout the sewing process.
This presser foot is particularly beneficial for adding a perfect topstitch because it allows for consistent seam allowances as you sew. The guide helps maintain a straight line, ensuring that the topstitching is uniform and parallel to the fabric edge, which is crucial for a professional-looking finish. It's especially useful for tasks that require precision, such as attaching lace, ribbons, or creating decorative borders on garments and home décor items. The edge presser foot takes the guesswork out of aligning and spacing, making it easier to achieve clean, straight lines, even for beginners.
STEP 3


Grab the second HOOD SIDE PANEL. Locate the back curved edge. Place it on the long side of the HOOD CENTER PANEL with right sides together.
Stitch at .25 inch seam allowance.
After stitching the HOOD CENTER PANEL to the HOOD SIDE PANEL. Fold the seam allowance toward the HOOD CENTER PANEL and add a top-stitch.
STEP 4


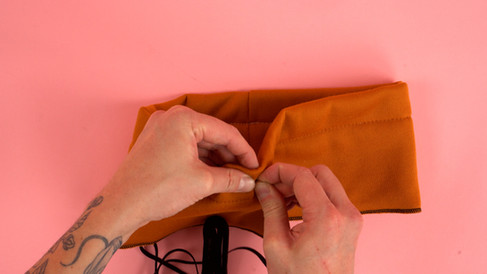
Using the pattern mark the eyelet placement guides on the HOOD SIDE PANEL.
Cut or punch out a hole in the HOOD SIDE PANEL.
We will be adding eyelets. The eyelets can be any size. I am using a smaller 3/8 inch eyelet.
They are very easy to install. Punch or cut holes in the eyelet placement guide marks.
Place the the large side of the eyelet through the placement guide hole from the right side of the fabric.
We will be using a standard hammer die to install the eyelet. This is a great way to go and typically comes with eyelets kits.
Slide the eyelets on the base. Place the hammer die end over top and hammer into place locking the backend of the eyelet to the front.
Repeat this set of the second eyelet placement guide.
After adding both eyelets it is best to roll the hem edge over. The edge should go pass the eyelets. The goal is to have the eyelets fall on the inside of the hem. The hem will end up becoming a loop passage for the elastic cord.
STEP 5


Grab the complete HOOD ASSEMNBLY.
Locate the hem guide on the pattern.
Roll the edge over(make sure it folds over pass the eyelets guides).
Place a few pins.
Add a stitch directly on the edge of the fabric covering the raw edge with a stitch.


Before moving onto the next step I recommend looking a few sewing techniques to elevate your product. The first method is using a cover stitch sewing machine.
A cover stitch sewing machine is a type of sewing machine that creates professional-looking hems similar to those you see on store-bought garments, especially on stretchy knit fabrics. Unlike a regular sewing machine that typically uses two threads (top and bobbin), a cover stitch machine uses multiple threads to create a double or triple stitch line on the top of the fabric, while simultaneously covering the raw edge with a looper thread underneath. This results in a stretchable stitch that is perfect for fabrics that need to retain elasticity, such as knits.
Benefits of using a cover stitch sewing machine.
Stretchability: The cover stitch is inherently stretchy, making it ideal for knit fabrics that need to maintain elasticity, such as when sewing hems on t-shirts or leggings.
Professional Finish: It provides a clean and professional finish to the hems and seams, mirroring what you would see in commercial garments.
Durability: The multiple threads and interlocking loops create a durable seam that withstands stretching and repeated wear and washing.
Versatility: Besides hemming, you can use a cover stitch machine for decorative purposes and to attach elastic, making it a versatile tool for working with stretch knit fabrics.
Prevents Puckering: The differential feed mechanism helps in managing stretchy fabrics, ensuring the fabric is not puckered or distorted during sewing.
Overall, a cover stitch sewing machine is an excellent investment for anyone working regularly with knit fabrics, as it offers durability, stretchability, and a high-quality finish.
The second method is setting up your domestic sewing machine with a twin double needle.
A twin or double needle is a sewing machine needle that consists of two needles attached to a single shank, designed to create two parallel rows of stitches simultaneously. It's used with a standard domestic sewing machine, transforming it into a tool that can somewhat mimic the look of a cover stitch, especially when used on the hem of knit fabrics.
Benefits of using a cover stitch sewing machine.
Hems: A twin needle is ideal for hemming stretch knit fabrics because it creates a hem that looks professional and stretches with the fabric, preventing popped seams when the fabric is stretched.
Elasticity: The zigzag pattern of the bobbin thread allows the fabric to stretch without breaking the stitches, making it perfect for stretchy materials.
Decorative Effects: Besides functional hems, twin needles can be used for decorative topstitching on knit fabrics, adding detail and professionalism to your projects.
Adaptability: Using a twin needle allows you to achieve a cover-stitch-like effect without needing a special cover stitch machine, making it a cost-effective solution for those who don't want to invest in an additional machine.
Prevents Tunneling: Some twin needles are designed specifically to prevent tunneling (where the fabric between the two rows of stitches puckers up). Using a stretch or ballpoint twin needle, appropriate for knit fabrics, can help mitigate this issue.
When using a twin needle on stretch knit fabrics, it's essential to use the right type of needle (stretch or ballpoint twin needle) to prevent skipped stitches and damage to the fabric. Also, ensure that your machine is set correctly for twin needle use to avoid needle breakage and other issues.
If you do not want to with of those options I highly recommend using a Zig-zag stitch.
A zigzag stitch is one of the most versatile stitches available on a sewing machine. It consists of stitches that go back and forth diagonally, forming a “Z” or zigzag pattern. This stitch is particularly useful for sewing stretch knit fabrics due to its inherent flexibility and strength.
Elasticity: The zigzag stitch stretches with the fabric, making it ideal for materials like knits and elastane that expand and contract. This prevents the seams from popping when the fabric stretches.
Edge Finishing: Zigzag stitches can be used to finish the edges of stretch knit fabrics to prevent fraying and rolling. It wraps the thread around the fabric edge, securing it neatly.
Seaming: When sewing seams on stretch fabrics, a zigzag stitch will provide stretchability and strength, ensuring the seam remains intact and flexible during wear and movement.
Versatility: You can adjust the size of the zigzag stitch for different effects and functions, such as applying elastic, creating decorative seams, or doing overcasting (which mimics the finish of an overlocker or serger).
Preventing Puckering: A zigzag stitch can help prevent puckering on stretchy fabrics, as it allows the fabric to lie flat and stretch evenly after sewing.
When using a zigzag stitch on stretch knit fabrics, it's often recommended to use a ballpoint or stretch needle, which is designed to prevent snagging or breaking the knit fibers. Additionally, practicing on a scrap piece of the fabric you'll be using for your project can help you find the perfect zigzag settings for your specific material.
STEP 6


Grab the NECK COVER PANEL.
Place the right sides together lining up the short edge.
Stitch at .25 inch seam allowance using a serger or zig-zag stitch.
STEP 7


After adding the stitch.
Fold the panel in half with wrong sides together. The raw edges should line up at the bottom.
Using the pattern locate eyelet placement guide and add markings.
Just link in previous steps. Add eyelets to both of the marked areas.
STEP 8


After adding the eyelets. Using the pattern. Locate the hem guide.
Mark the hem guide on the NECK COVER PANEL.
Add a stitch directly on top of the marked guide using a cover stitch sewing machine or a regular straight stitch.
STEP 9


After adding the hem stitch.
Using a serger or zig-zag stitch clean up the bottom edge of the NECK COVER PANEL.
This step is optional but will make future steps easier.
STEP 10


Next we will be adding elastic to the NECK COVER PANEL. Feel free to use braided or cord elastic.
When it comes to feeding elastic through a closed hem. Try using a safety pin to help guide the elastic end. Clip the safety pin on the elastic end. From here work the pin through the eyelet round the hem and out the other eyelet. The safety pin acts as a structure you can feel and move within the hem.
STEP 11


Choose the best style of cord stopper that works with your design. I will be using a double opening cord stopper.
Feed one end of the elastic through both openings of the cord stopper.
With one end through the cord stopper. Pull the end out about 2-4 inches.
Overlap both of the elastic ends.
Add a stitch on top of the overlapped ends. I recommend using a short zig-stitch in the opposite direction of the stretch if possible.
STEP 12


Grab the SHOULDER COVER PANEL.
Place the right sides together lining up the edge opposite of the fold.
Add a stitch with .25 inch seam allowance using a serger or zig-zag stitch.
After adding the stitch. Roll the seam allowance to the left or the right.
Add a top-stitch directly on top of the seam allowance.
STEP 13


Using the pattern locate and mark the hem guide at the bottom of the SHOULDER COVER PANEL.
Place pins along the hem to secure it in place.
Using a cover stitch machine or zig-zag stitch add a stitch securing down the hem. The same way we did above when adding the hem stitch to the complete HOOD PANEL assembly.
STEP 14


Grab the complete HOOD PANEL, NECK COVER PANEL, and SHOULDER COVER PANEL.
Starting with the NECK COVER PANEL. Make a marking on the bottom edge directly in the center below the eyelets.
Line the bottom edge of the NECK COVER PANEL and HOOD PANEL. The front bottom edges of the HOOD PANEL closes to the eyelets should slightly over lap on the center marking of the NECK COVER PANEL.
Next grab the SHOULDER COVER PANEL. Find the edge opposite of the hem. Place the right side of the fabric on the bottom edge of the HOOD PANEL.
The back seam of the SHOULDER PANEL should line up in the center of the back HOOD PANEL.
At this point all three of the panels should be lined up. Add a stitch at .25 inch seam allowance. Depending on the type of fabric being used. This edge can get fairly bulky. If needed use a straight stitch or heavy duty serger.
STEP 15


After stitching all of the panels together. Pull the right sides out.
Next we are going to add a drawstring or cord the the HOOD PANEL hem.
Add in the same way using a safety pin.
Depending on the type of cord you are using I highly recommend burning the ends with a lighter. This will prevent fraying of the cord.
With the ends sealed. Find the style of cord stopper that works best with your fabric and design.
Feed the cord stoppers on the cord and tie of the ends to prevent the cord stoppers from sliding off.
STEP 16


The final step is adding your custom branding I recommend adding tabs to the front elastic loops for easy cinch adjustment. Another quick fun detail is adding beads to the drawstring in between the knot and cord stopper.
Adding a branded leather patch to your balaclava is a fantastic way to customize and elevate the final product. By incorporating your brand, you not only enhance the aesthetic appeal but also infuse a sense of identity and uniqueness into the design. Here's how the process works, especially with the use of double-sided rivets, to secure the branded leather effectively:
Branded Leather Creation: The first step involves creating a leather patch that carries your brand's logo or name. This can be achieved through various methods such as stamping, burning, laser engraving, or embossing, depending on the desired effect and the resources available. The key is to ensure clarity and durability of the branding on the leather, as this will be a prominent feature of the fanny pack.
Positioning: Once the branded leather patch is ready, the next step is to decide on its placement on the fanny pack. The location is crucial as it affects visibility and aesthetics. Common spots include the front center, where it's most visible, or on a discreet side for a more understated approach. The goal is to choose a spot that complements the design of the fanny pack and enhances its overall look.
Using Double-Sided Rivets: Double-sided rivets are chosen for their strength and ability to securely fasten the leather patch without damaging the materials. To attach the patch, small holes are made in the corners of the leather patch and corresponding spots on the fanny pack. The double-sided rivets are then inserted through these holes from the underside of the fanny pack fabric, through the leather patch, and capped on the top side. A rivet setter tool is used to clamp down the rivets, ensuring a tight and secure attachment.
Adding a branded leather patch with double-sided rivets to a balaclava not only personalizes the item but also significantly boosts its value, making it a unique piece that stands out. This customization is a testament to craftsmanship and attention to detail, reflecting the maker's pride and the brand's identity. It transforms the fanny pack from a mere accessory into a statement piece, enhancing its appeal to customers looking for something special and personal.
Thank you! for taking the time to explore our large balaclava sewing project! It's been a pleasure to share this creative journey with you, and I sincerely hope you enjoyed the process of making your very own balaclava. Crafting something with your own hands is a rewarding experience, and using your creativity to produce a beautiful, finished product is truly special. I hope that your fanny pack not only turned out great but also reflects your unique style and creativity. Thank you again for joining in on this sewing adventure. May your new balaclava accompany you on many exciting outings, filled with pride in your craftsmanship and the joy of creation.
CLICK IMAGE TO ENLARGE
FULL STEP BY STEP VIDEO INSTRUCTIONS
Need a Visualization of the Sewing Process?
Dive into our detailed step-by-step video tutorials to effortlessly navigate through any confusing steps or simply to gain a clearer visualization of the sewing process. These tutorials are designed to provide you with comprehensive guidance, ensuring you have a smooth and enjoyable sewing experience. Whether you're a beginner seeking clarity or an experienced sewer looking for tips, our videos are a valuable resource to help bring your project to life with confidence.
Show the Finished Project!
We absolutely love seeing your creative masterpieces come to life using our sewing patterns! Share your finished projects with us by tagging @properfitclothing on Instagram and any other social media platforms. Your unique creations not only inspire us but also the entire sewing community. Don't miss this opportunity to showcase your talent and be part of our growing family of passionate sewers. Let the world see what you've made – we can't wait to celebrate your amazing work!
