
How to Make a Fishing Trucker Cap

Pattern Description
Model #
C001
Fishing style trucker cap sewing pattern. Great sewing project for all skills levels.
This is a one size fits all pattern with an adjustable strap back closure.
Download includes supply list and full pattern.
All patterns are designed to print on standard household printers.
DON'T WANT TO READ OFF YOUR DEVICE? PRINT PDF HERE
WANT TO WATCH THE STEP BY STEP VIDEO? LINK HERE
PROJECT SUPPLIES
Main Fabric: | .25 yards (canvas, denim, twill, upholstery fabric) |
Brim Visor Board: | 1 plastic or cardboard (https://www.capsupplyco.com/10-baseball-visor-brims) |
Sweatband: | |
Button: | |
Size Strip: | 1 (25+ inches) () |
Back Closure: | 1 Set (any style. Leather buckle strap back, nylon clip, plastic snapback)(https://www.capsupplyco.com/5-brown-leather-brass-buckle) |
Buy a Cap Making Kit! |
Images below show supplies used in project.
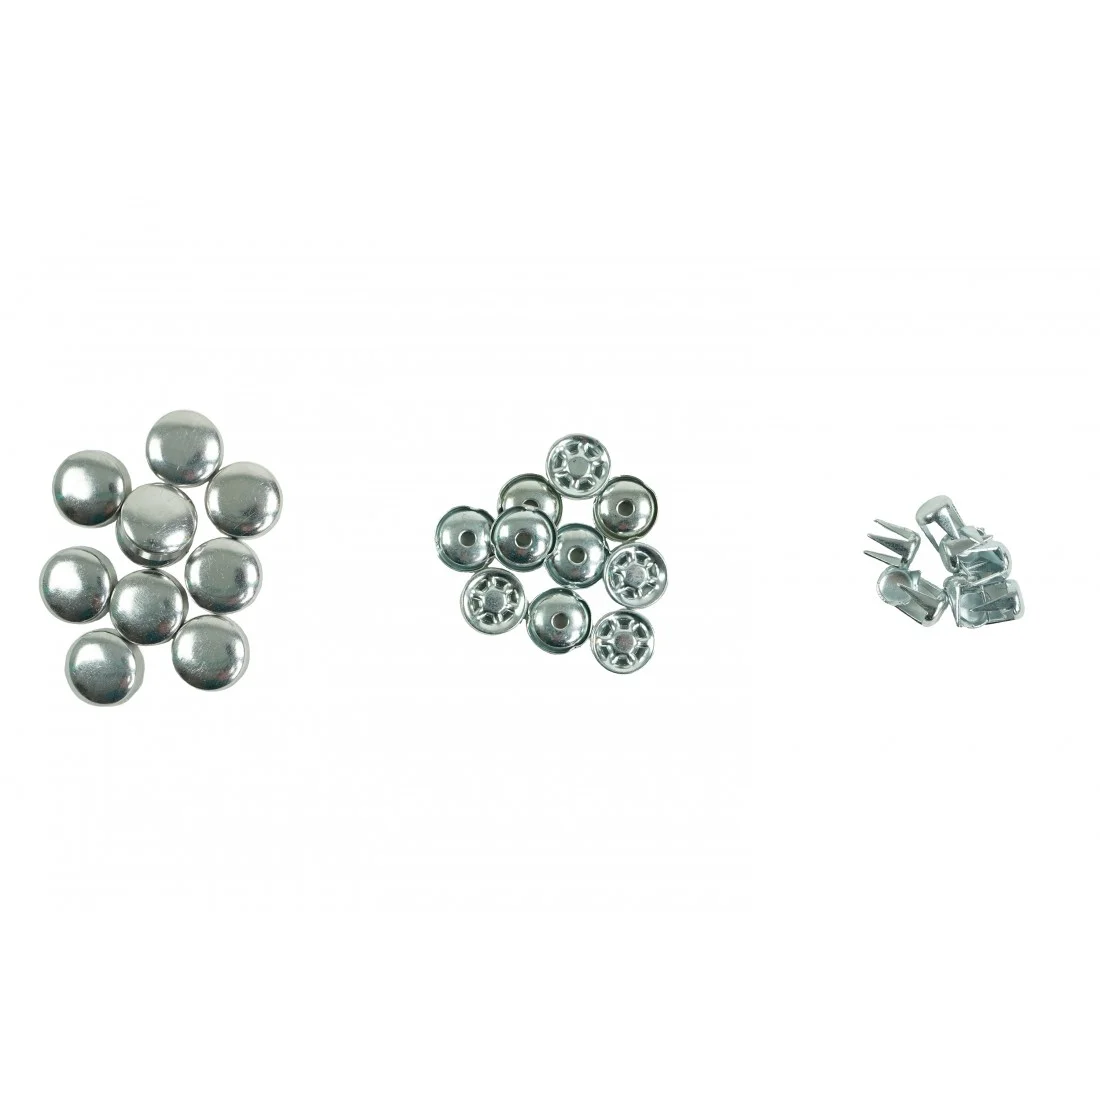
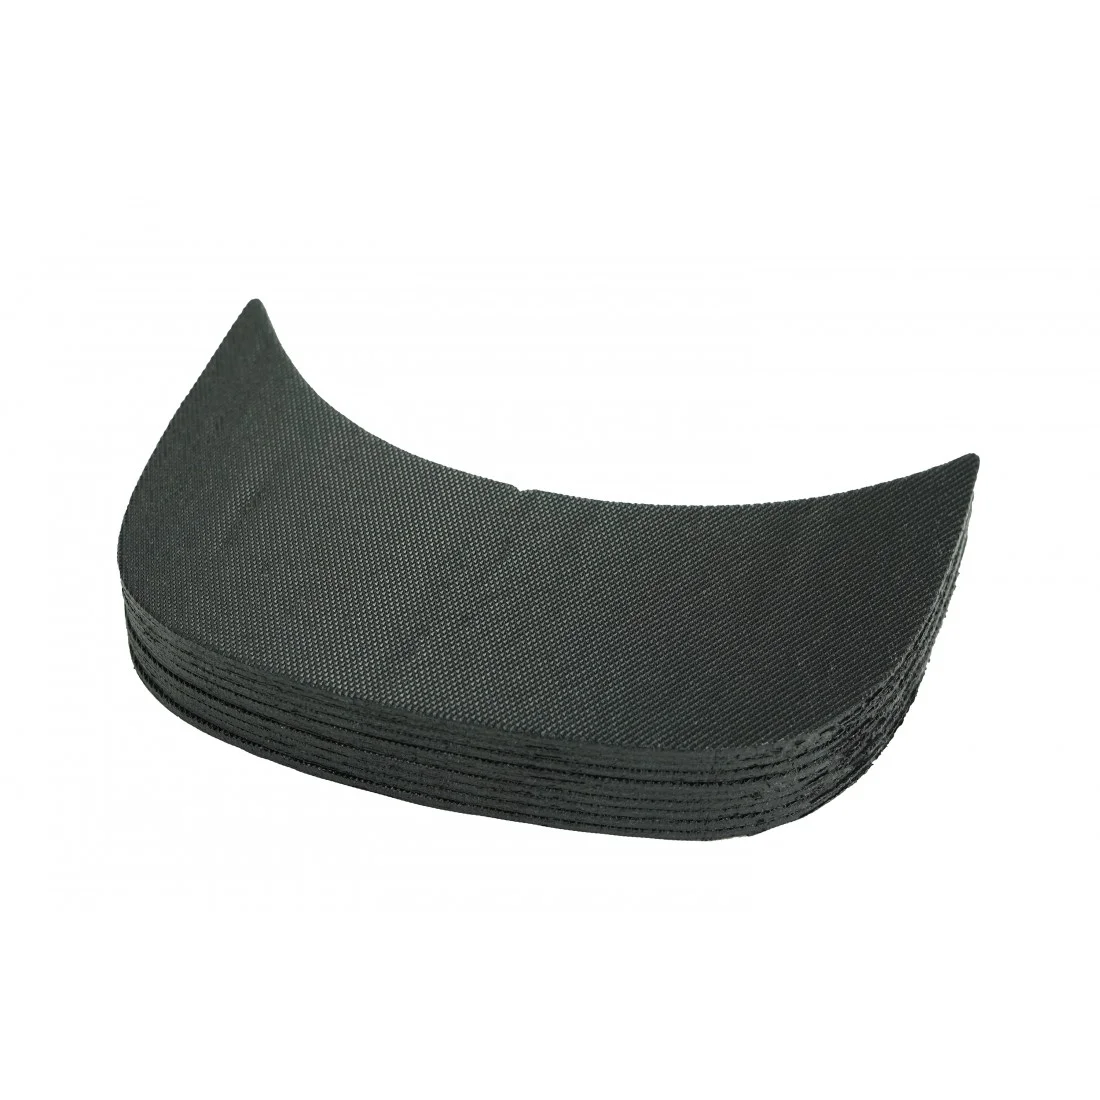
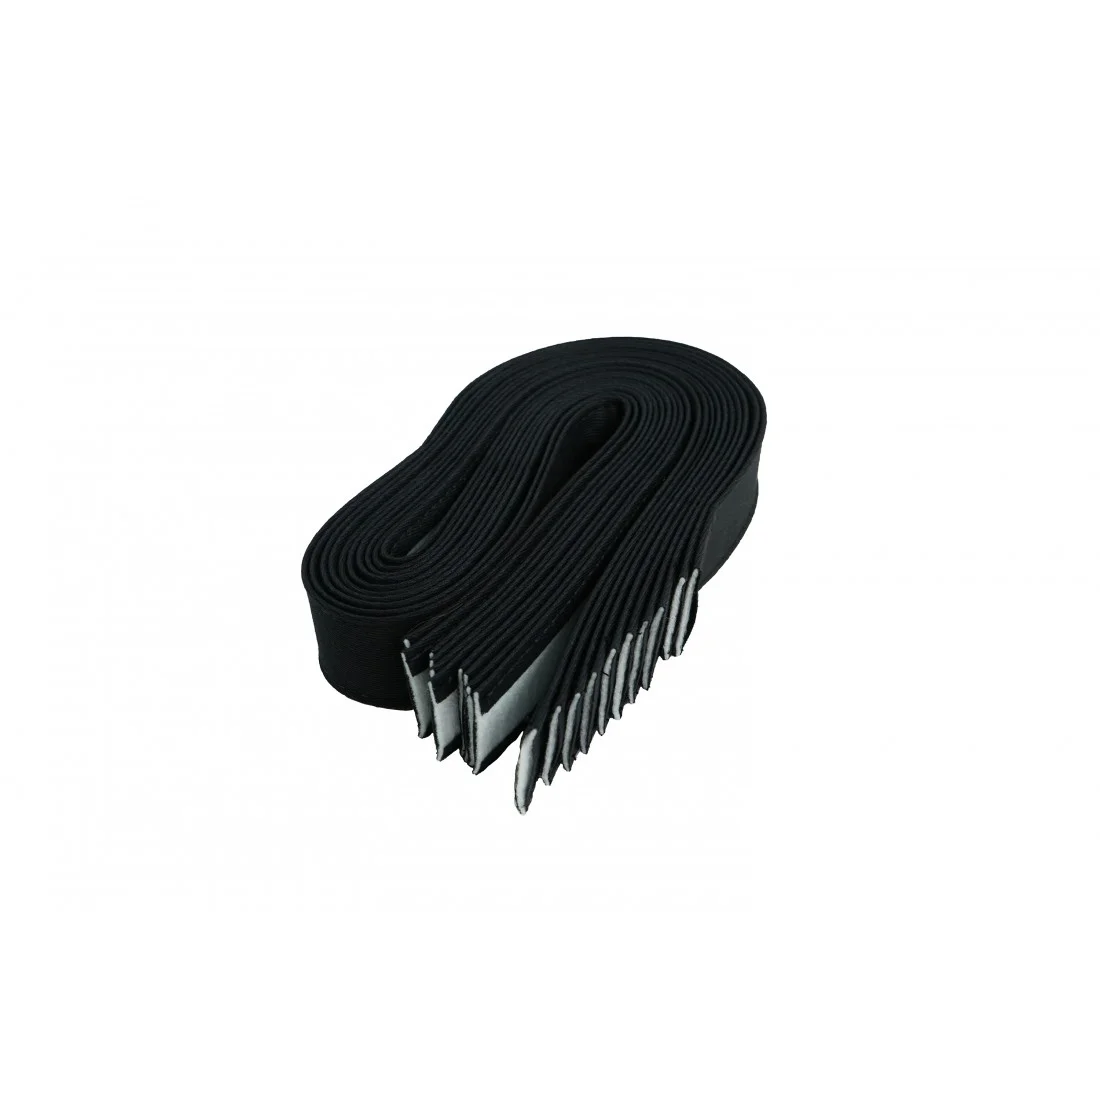

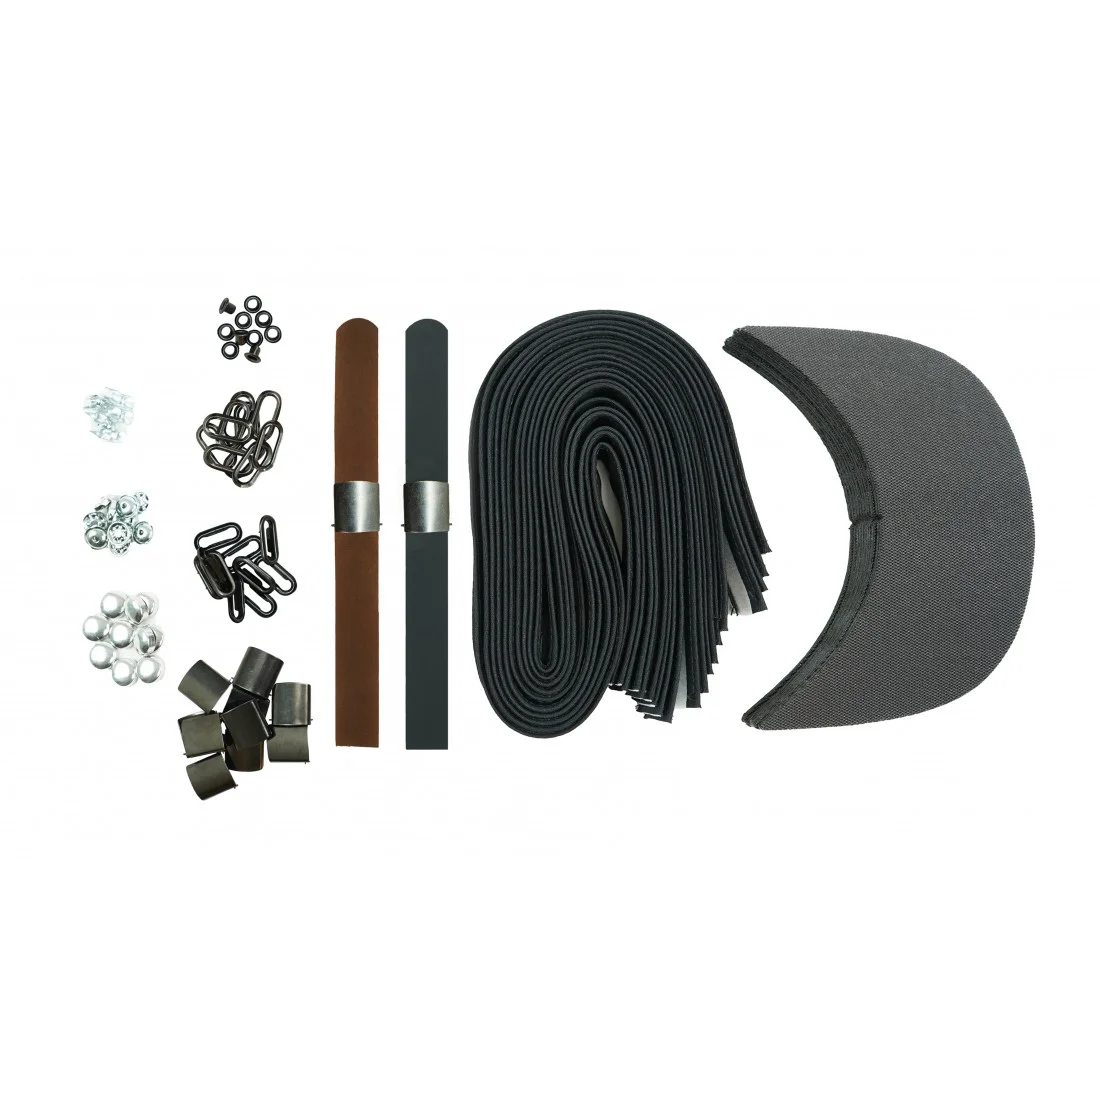
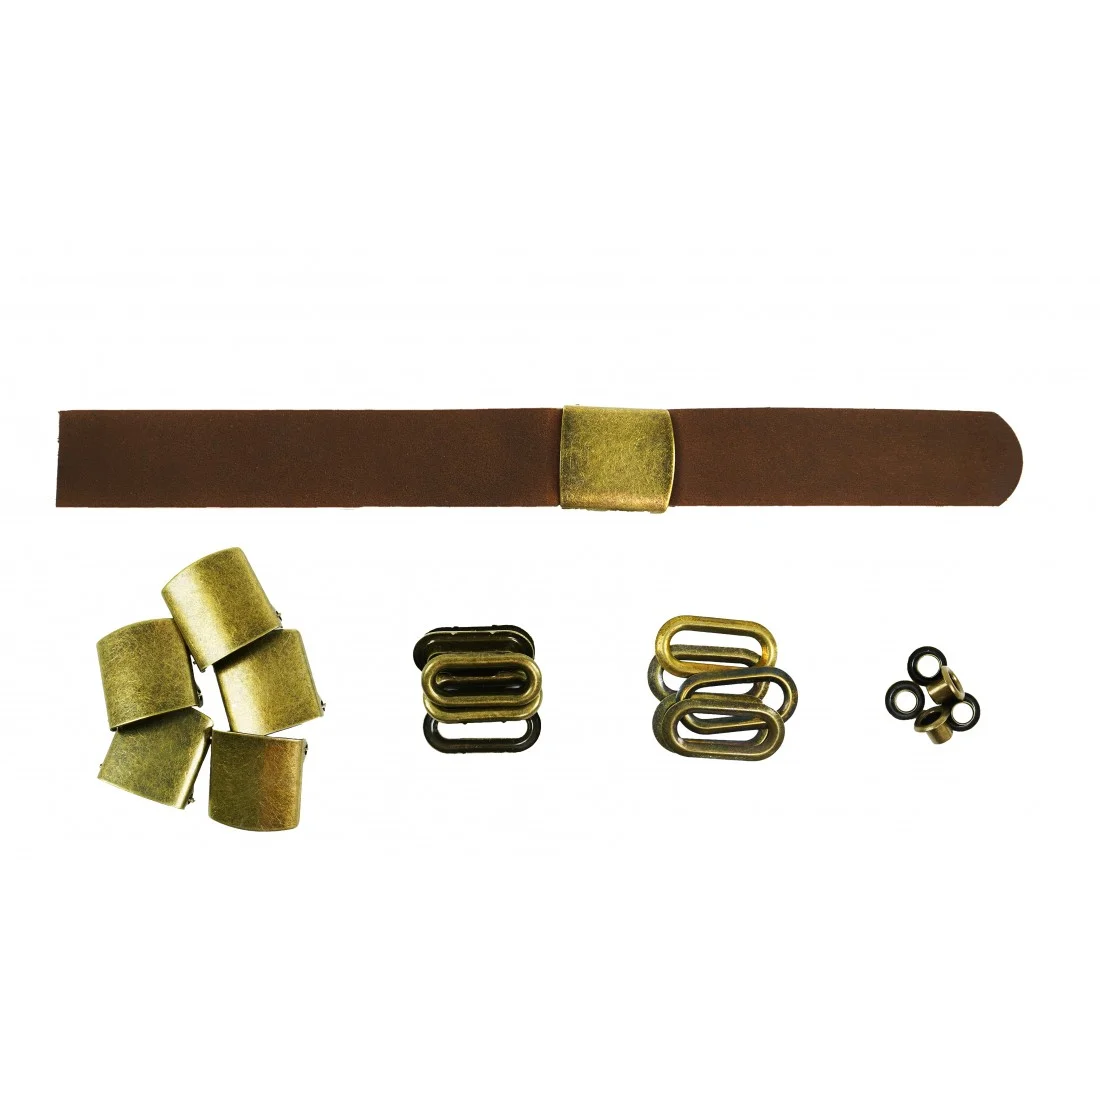
NOTE: All supplies can be changed and switched to your liking. Get creative and have fun picking out custom materials.
Recycling/repurposing old clothing and furniture into fabric not only gives these items a second life but also significantly contributes to reducing waste and promoting sustainable living.
List of a few common items: Upholstery Fabric, Curtains and Draperies, Bed Linens and Towels, Sweaters, Denim (jeans and jackets), Sweater, Quilts, Tote bags, Cleaning rags, T-Shirts. Any type of fabric can be utilized and recycled.
SCROLL TO VIEW ENTIRE TABLE CONTENTS
For a professional finish on your project, make sure to check out our recommended machines and tools! We've curated a list of essential sewing equipment to help you achieve that expert look with ease. You'll find all the information you need by clicking the button right here. Don't miss out on elevating your sewing game to the next level!
RECOMMENDED MACHINES/TOOLS
PRINTING PATTERN


When printing your sewing pattern, it's crucial to ensure that the pattern is printed at 100% scale or "actual size" in the print settings. This step is important to maintain the integrity of the design and ensure that the dimensions are accurate for your project. Not adjusting the print settings accordingly can result in a pattern that is either too small or too large, leading to potential issues with the fit and final outcome of your sewing project.
Check size scale at the top of the page.
Cut on the outside of the black line.
CLICK IMAGE TO ENLARGE
PATTERN PIECES


Pencil Holder Panel: Cut 2 total. 2: Main Fabric (This panel/feature is optional)


Front Panel: Cut 1 total. 1: Main Fabric (Cut 1 interfacing large than front panel)


Brim Panel: Cut 1 total. 1: Plastic or cardboard (Cut 2 main fabric panels large than brim width and length)


Back Panel: Cut 2 total. 2: Main Fabric


Side Panel: Cut 2 total. 2: Main Fabric
CLICK IMAGE TO ENLARGE
STEP BY STEP ASSEMBLY
STEP 1


Starting with the PENCIL HOLDER PANEL (This feature is optional. Feel free to skip ahead if you are not adding the pencil holder)
Locate the side edge of each panel.
Place right sides together.
Stitch both side edges at .25 inch seam allowance.
STEP 2


After stitch flip the right sides out.
Line up side edges.
Add top stitch to both side edges
Serger or zig zag stitch top and bottom raw edges. This will seal the raw edge and prevent unraveling.
Pencil holder assembly is complete! For the moment you can set the assembly to the side.
Pro Tip: use a edge presser foot to get a nice clean stitch and try matching the thread to the fabric color. This will help hide and imperfections within the stitch.
STEP 3


Grab BRIM PANEL.
Cut brim visor out of plastic or cardboard.
Use the outside bold line of the pattern to make your cut.
Pro Tip: Checkout capsupplyco.com for professional grade brims and visors. They are precut and ready to use.
STEP 4


Cut 2 pieces from main fabric. Make sure they are larger than the brims width and length.
Place fabric right sides together.
Place brim on wrong side of fabric and trace the outside edge.
Using the pattern locate the "Stitch Path Guide". It is about .15 inches in from the outer most edge.
Stitch the outside curved edge of the brim following the stitch path guide. Start and stop the stitch about 1-2 inches below the bottom corner of the brim. Note: Try sewing this stitch in one go. Starting and stopping mid stitch and result in irregular points when inserting the brim.
STEP 5


Trim fabric .25-.4 inches away from stitch.
Flip right sides out.
Adjust inside seam allowance until flap. Press seam with iron.
STEP 6


Grab brim cut out and place it in the brim sleeve. Push forward until outside curved edge is tight and flat. You may need to remove brim and press more if it is bunching. Note: Heavy weight fabric can be result in extra bulk and bunching. Try using a lightweight fabric when assembling the brim sleeve.
Place pin on inside curved edge to keep fabric tout around brim.
Stitch entire inside curved edge. Close as you can to the brim edge.
STEP 7


Using a guide. Add top stiches to brim. Add as many as needed and space freely. I Added 4 and spaced them .25 inch apart.
These stitches are optional. They help secure the fabric to the brim. If you do not have the proper equipment you can skip this step. Keep in mind the plastic brims are designed to be used on domestic and industrial sewing machine. I recommend using a heavyweight needle and giving it a try.
STEP 8


After stitching trim back curved edge. Leaving .5 inches of fabric. This extra fabric will be used to attach the crow in future steps.
Brim assembly is complete! For the moment you can place it off to the side.
STEP 9


Grab FRONT PANEL.
Cut interfacing larger than FRONT PANEL. Interfacing is optional. It helps structure front of crown peak. If you are looking to make a not structure peak skip ahead to next step.
Place the wrong side of FRONT PANEL on adhesive side of interfacing. Using a heat press if iron. Adhering fabric to interfacing.
Note: Using a heat press speeds up the process and allows you to make more at once. This is great for larger scale cap manufacturing.
STEP 10


Using pattern chalk "Eyelet Placement Guide"
This next step is optional. Add embroider to center of FRONT PANEL below eyelet placement guides. I like to add embroidery at this stage because it always turned out better working wiht a flat panel.
STEP 11


Trim interfacing around FRONT PANEL.
STEP 12


Grab FRONT PANEL.
We will be adding eyelets as vents.
Using pattern chalk "Eyelet Placement Guides"
Punch holds in eyelet placement guides to the size eyelet you are using.
Feed right side of eyelet through opening.
Add the back part of the eyelet on the wrong side of the FRONT PANEL.
Using a hammer die, die press, or eyelet machine. Secure eyelets into place.
REPEAT this set for BACK PANELS and SIDE PANELS.
Note: You can use any size eyelets work for this step. You can also use a circle button hole machine to make these vents.
STEP 13


Grab FRONT PANEL.
Locate peak seam allowance cut guide on pattern. It is located in the center between the 2 peaks.
Trim on the guide up to the .25 inch seam allowance. Do not cut pass the seam allowance.
Fold right sides together lining up both FRONT PANEL peaks.
Stitch inside edge of peak at .25 inch seam allowance up to the peak cut.
After stitching clean up raw edge using a serger or zig zag stitch.
STEP 14


Grab FRONT PANEL and SIDE PANEL
Locate "Sew to Front Panel Edge" on SIDE PANEL.
Place right sides together lining up "Sew to Front Panel Edge" of SIDE PANEL with the correct edge of the FRONT PANEL.
Place second SIDE PANEL off to the side. We will use it in later steps.
Stitch edge at .25 inch seam allowance. Make sure you are very accurate with your stitch allowance. Small changes can throw off the overall fit of the cap.
STEP 15


Using a double fold attachment and a twin needle machine or dual needle setup. Add bias tape to the new seam. If you do not have a double needle sewing machine I will show you how to adjust your single needle machine in the next step.
Note: Using a dedicated double needle sewing machine helps speed up production.
STEP 16


Place the twin needle into the domestic machine.
Switch machine to zigzag stitch with 0 width.
Add folder on to the machine. I used tape this is because the folder is designed for a industrial sewing machine mounts but it still can work on a domestic sewing machine.
Thread the machine with two spools of thread and you are good to go!
Grab the panels and sewing directly in the center of the seam with right sides facing up. This will add a top stitch to the right side and bias tape to the wrong side.
STEP 17


Grab BACK PANELS.
Place the right sides together lining up the outside edges.
Using the pattern locate the back edge.
Stitch back edge at .25 inch seam allowance.
STEP 18


Repeat steps 15/16 (add double fold bias tape to way edge)
STEP 19


Grab BACK PANEL assembly and remaining SIDE PANEL.
Locate "Sew to Back Panel Edge" on SIDE PANEL.
Place right sides together lining up "Sew to Back Panel Edge" of SIDE PANEL with the correct edge of the BACK PANEL.
Stitch edge at .25 inch seam allowance. Make sure you are very accurate with your stitch allowance. Small changes can throw off the overall fit of the cap.
Repeat steps 15/16 (add double fold bias tape to way edge).
STEP 20


Grab all crown assemblies.
Place the right sides together. Lining up the center top and bottom edges.
Stitch edge at .25 inch seam allowance.
STEP 21


After stitching trim bias tape ends flush with seam allowance.
Repeat steps 15/16 (add double fold bias tape to way edge).
STEP 22


Grab Size Strip (this step is optional)
Line up size strip along inside bottom edge of crown assembly.
Stitch down. I typically stitch directly in the middle of the size strip.
STEP 23


After stitching trim size strip and bias tape ends flush with the fabric. Make sure nothing is sticking out pass the bottom or back closure opening.
Add bias tape tape to back opening edge. I will show you different bias tape techniques on the next step.
STEP 24


This step we will go through the options for sealing off the raw edges on the inside of the bag.
The first option is us precut double fold bias tape. This step requires the least amount of machines and tool. The only thing required to the bias tape that can be purchased online or from your local fabric/hobby store.
To install the precut bias tape you simple fold it over the inside raw edge and stitch it down.
The second option is a bias tape making kit. A bias tape making kit is a handy tool set designed for sewing enthusiasts to create custom bias tapes with ease. Bias tape is a narrow strip of fabric cut on the bias (diagonally to the grain of the fabric) which makes it stretchy and flexible, ideal for finishing edges, binding seams, or creating decorative borders on fabric projects. The kit typically includes several essential tools to simplify the process of making bias tape from any fabric of your choice.
Bias Tape Makers: These are the central tools in the kit, coming in various widths to create different sizes of bias tape. A bias tape maker is a small, metal or plastic device through which you feed a strip of bias-cut fabric. As the fabric is pulled through the tool, it is folded into halves automatically, forming a neat, uniform strip. The narrow end of the tool is where the fabric is fed in, and as it comes out the wider end, it emerges folded.
Bias Binding Foot: Some kits include a bias binding foot for a sewing machine, which helps in attaching the bias tape to the fabric edges neatly and efficiently.
Awl or Fabric Feeder: This tool is used to help guide the fabric smoothly through the bias tape maker if needed.
Quilting Pins or Clips: These are used to hold the fabric in place, especially when pressing or sewing.
Measuring Tools: A ruler or measuring tape may be included for precise cutting of fabric strips.
How it Works:
Prepare the Fabric: First, you cut your fabric into strips at a 45-degree angle to the grain line. The width of the strips depends on the width of the bias tape maker and the desired width of the finished bias tape.
Feed the Fabric: Insert one end of the bias strip into the wide end of the bias tape maker. You might need to use an awl to help initiate the feeding process.
Iron as You Pull: As you gently pull the bias tape maker along the fabric strip, with the fabric emerging folded from the narrow end, you press (iron) the folds into place, creating a neat, flat bias tape.
Sewing (Optional): For double-fold bias tape, you would fold the tape once more along its length and press it again before sewing it onto your project. Some prefer to sew it directly onto the fabric as it comes out of the bias tape maker.
The final option is using a double fold bias take binder attachment. This is the most effective option.
A double fold bias tape binder attachment is a specialized sewing machine accessory designed to apply double-fold bias tape to the edges of fabric in one continuous action. It's an incredibly efficient tool for binding fabric edges, making it popular for finishing quilts, garments, and other sewing projects where a neat, durable edge is desired. This attachment simplifies the process of applying bias tape, saving time and ensuring consistent, professional-looking results.
How it Works:
Preparation of Bias Tape: Before using the attachment, you must have double-fold bias tape ready. Double-fold bias tape is a strip of fabric that has been cut on the bias (diagonally to the fabric's grain), then folded and pressed to hide raw edges. It is folded in half again to encase raw fabric edges fully. You can make your own bias tape using a bias tape maker tool or purchase pre-made bias tape.
Attachment to the Sewing Machine: The double fold bias tape binder attachment is mounted onto the sewing machine in place of the standard presser foot. It is attached to the machine's foot holder or shank, depending on the specific design of your sewing machine and the attachment.
Feeding the Bias Tape and Fabric: The bias tape is fed into the binder through a series of slots or guides that first unfold it to its full width. The raw edge of the fabric that needs binding is then placed in between the unfolded layers of the bias tape as it enters the attachment. As the tape and fabric are fed through the attachment, the bias tape is refolded over the fabric's edge, encasing it completely.
Sewing: As you sew, the attachment guides the encased fabric edge under the needle, allowing you to stitch the bias tape in place in one step. The sewing machine stitches through the bias tape and fabric, securing the tape and creating a neatly bound edge.
Efficiency: Significantly reduces the time and effort required to apply bias tape, especially on large projects.
Consistency: Ensures uniform, consistent binding along the length of the fabric edge.
Versatility: Can be used on a wide range of fabric types and projects, from clothing to home décor.
STEP 25


Grab the complete crown assembly and brim assembly.
Mark the center on bottom edge of FRONT PANEL and inside curved edge of BRIM PANEL.
Place right sides together. Linking up the bottom of the FRONT PANEL crown with the inside curved edge of the BRIM.
Stitch crown to brim. Make the stitch close to the brim as possible. Sometimes I find it easiest to start stitching at the center. Sew one half and go back to the center to sew the opposite half. This is a great way to keep the crown aligned with the brim.
Note: In the images the red fabric was mediumweight. It turned out fairly bulky so I make a new brims sleeve out of a lightweight fabric (tan fabric). This is something you may want to play around with to find the best outcome for your cap.
STEP 26


Grab PENCIL HOLDER assembly (this step if for anyone adding the pencil holder).
Figure out what side of the cap you want the PENCIL HOLDER to be placed on.
Line the PENCIL HOLDER assembly up with the bottom edge in the center of the side panel.
Roll the top edge over .25 inches hiding the serged/zig zag stitched edge and place a pin to keep it in position.
Stitch the top and bottom edge.
Note: You can also change the size of the pencil holder to work with other tools. This can be done by adjusting the overall height.
STEP 27


Cut a piece of cord long enough to extend pass brim edges.
Place cord on top of brim butted up against crown.
Stitch cord ends close as you can to the bottom edge of crown. I typically place my stitch on the size strip area.
STEP 28


Grab a sweatband. This can be made but I do recommend buying a professional grade sweatband for the best results.
To install the sweatband easily. I made a guide out of heavy stock paper. Make sure it fits the sweatband nice and snug. This will keep the sweatband from moving around while sewing.
Tape the guide on the machine.
Roll the edge of the crown over so the wrong side of the sweatband is touching the right side of the crown. Begin to sew.
This process will attach the sweatband and also provide a top stitch.
Leave about a inch of extra sweatband hanging off the back edge.
Advanced Sweatband Attachment


If you are looking to speed up production I recommend looking into a post best sewing machine with a sweatband attachment. This will allow you to sew the sweatband directly to the bottom edge of the crown. Giving you enough height to clear the brim.
STEP 29


Decide on what type of back closure. I am installing the leather strap back from capsupplyco.com
Fold sweatband sticking past the back edge inward and roll it up. So the sweatband in on the inside of the crown.
Slide the leather strip in between the crown and the sweatband. Use the same process if you are installing nylon clips or snapback.
Stitch directly on the back opening edge starting at the top of the sweatband. Locking the layers together.
Repeat this step for the opposite side.
STEP 30


Wrap the leather strap to the opposite side of the back opening and mark where it falls. This will be the spot we install the cap buckle. I always like to double check the alignment before installing the buckle. If it is not aligned. The back opening will be offset.
Punch hole in marked area for eyelet. Keep in mind you are punching through all the layers including the sweatband.
Place buckle opening on right side of crown over punched hole in correct orientation to the strap.
Slide eyelet through buckle opening and punched hole.
Using a die press or hammer die. Secure it down. This will lock the buckle in place along with all the layers of fabric.
Feed the leather strap through buckle opening.
STEP 31


Grab the 3 piece cap cover button.
Place fabric around the top dome of cover. Wrapping the fabric around to the inside of the dome.
Place middle section inside the dome with prong openings facing out. This will be a tight fit. You may need to use a hammer but be carful not to bend the dome section.
Cover button is ready to install.
STEP 32


Push the bottom prong section of the cover bottom though the center of the crown from the wrong side of the fabric.
Line up the top section of the cover bottom with the prongs sticking though the right side of the fabric.
Using a die press or hammer. Gently tap it into position. The prongs will enter the center section of the bottom and bend outwards locking all the layers together.
STEP 33


Using a hat block. Tighten the back strap.
Place hat securely on hat block. Try to make it a very snug fit.
Steam entire cap. This will flatten out the sweatband and bias tape. Giving it a professional store bought finish.
FINISHED


The final step is adding your custom branding. Adding a branded leather patch to your fishing trucker cap is a fantastic way to customize and elevate the final product. By incorporating your brand, you not only enhance the aesthetic appeal but also infuse a sense of identity and uniqueness into the design. Here's how the process works, especially with the use of double-sided rivets, to secure the branded leather effectively:
Branded Leather Creation: The first step involves creating a leather patch that carries your brand's logo or name. This can be achieved through various methods such as stamping, burning, laser engraving, or embossing, depending on the desired effect and the resources available. The key is to ensure clarity and durability of the branding on the leather, as this will be a prominent feature of the fanny pack.
Positioning: Once the branded leather patch is ready, the next step is to decide on its placement on the fanny pack. The location is crucial as it affects visibility and aesthetics. Common spots include the front center, where it's most visible, or on a discreet side for a more understated approach. The goal is to choose a spot that complements the design of the fanny pack and enhances its overall look.
Using Double-Sided Rivets: Double-sided rivets are chosen for their strength and ability to securely fasten the leather patch without damaging the materials. To attach the patch, small holes are made in the corners of the leather patch and corresponding spots on the fanny pack. The double-sided rivets are then inserted through these holes from the underside of the fanny pack fabric, through the leather patch, and capped on the top side. A rivet setter tool is used to clamp down the rivets, ensuring a tight and secure attachment.
Adding a branded leather patch with double-sided rivets to a cap not only personalizes the item but also significantly boosts its value, making it a unique piece that stands out. This customization is a testament to craftsmanship and attention to detail, reflecting the maker's pride and the brand's identity. It transforms the fanny pack from a mere accessory into a statement piece, enhancing its appeal to customers looking for something special and personal.
Thank you! for taking the time to explore our fishing trucker cap sewing project! It's been a pleasure to share this creative journey with you, and I sincerely hope you enjoyed the process of making your very own caps. Crafting something with your own hands is a rewarding experience, and using your creativity to produce a beautiful, finished product is truly special. I hope that your caps not only turned out great but also reflects your unique style and creativity. Thank you again for joining in on this sewing adventure. May your new caps accompany you on many exciting outings, filled with pride in your craftsmanship and the joy of creation.
CLICK IMAGE TO ENLARGE
FULL STEP BY STEP VIDEO INSTRUCTIONS
Need a Visualization of the Sewing Process?
Dive into our detailed step-by-step video tutorials to effortlessly navigate through any confusing steps or simply to gain a clearer visualization of the sewing process. These tutorials are designed to provide you with comprehensive guidance, ensuring you have a smooth and enjoyable sewing experience. Whether you're a beginner seeking clarity or an experienced sewer looking for tips, our videos are a valuable resource to help bring your project to life with confidence.
Show the Finished Project!
We absolutely love seeing your creative masterpieces come to life using our sewing patterns! Share your finished projects with us by tagging @properfitclothing on Instagram and any other social media platforms. Your unique creations not only inspire us but also the entire sewing community. Don't miss this opportunity to showcase your talent and be part of our growing family of passionate sewers. Let the world see what you've made – we can't wait to celebrate your amazing work!
